Thursday 27 April 2017

Code to check if the Dimension exist for the item AX 2012

The following code is used to check if the Dimension exist for item.
while select inventTable where inventTable.DefaultDimension == 0
    {
       
         if(EcoResStorageDimensionGroupItem::findByItem(inventTable.DataAreaId, inventTable.ItemId).StorageDimensionGroup
            && EcoResTrackingDimensionGroupItem::findByItem(inventTable.DataAreaId, inventTable.ItemId).TrackingDimensionGroup)
        {
            continue; // exist
        }
        else
        {
             // not exist do some thing.
        }
}

Wednesday 26 April 2017

Script to deploy AIF service

Below is the script for automatically deploy or undeploy  AIF service.
In this example update the port with current company and deploy the service.
static void mk_AIFDeployPort(Args _args)
{
    AifPort  port;
    AifPortName portName = "AdvancedBankReconciliation";
    AifPortManager::undeployPort(portName);
    port = AifPort::find(portName,true);

    if(port)
    {
        ttsBegin;
        if(port.Company != curext() )
        {
            port.Company = curext();
            port.update();
        }
        ttsCommit;
    }
    AifPortManager::deployPort(portName);
}

Wednesday 12 April 2017

BAI2 File format Advance Bank Reconciliation

Advance Bank Reconciliation

Advance Bank Reconciliation allows for the import of bank statements that can be automatically reconciled from within AX2012. How to perform an advanced bank reconciliation and assumes that AX has been setup correctly as below.


  1. Ctrl+D to open the AOT. Expand Resources and locate “BAI2CSV_to_BAI2XML_xslt”, and then right-click and click “Open”.
  2. On the form that opens, change “Resource type” to “XML document”. Click “Export”. 
  3. Export the file to a directory on your machine.
  4. Repeat steps 1-3, this time for the “BAI2XML_to_Reconciliation_xslt”.
  5. Go to Tools | Application Integration Framework | Manage transforms. Click “New”, and enter “CSV to XML”. Click “Load”. Change the file extension to “XSLT files” to ensure you can see the files exported earlier. Select the “BAI2CSV-to-BAI2XML.xslt” file, and click “Open”.
  6. Click “New”, and enter “XML to Reconciliation”. Click “Load”. Change the file extension to “XSLT files” to ensure you can see the files exported earlier. Select the “BAI2XML-to-Reconciliation.xslt” file, and click “Open”.
  7. Close the “Manage transforms” form and close the AOT.
  8. Go to System administration | Setup | Services and Application Integration Framework | Inbound ports. Click “New”, enter “AdvancedBankReconciliation” for the “Port name” and “Description”. Change the “Adapter” to “File system adapter”. Click the drop-menu for “URI” and click the location of the bank transform files.
  9. On the “Service contract customizations” fast tab, click “Service operations”. Select BankStmtService.create, BankStmtService.delete, BankStmtService.find, BankStmtService.getChangedKeys, BankStmtService.getKeys, and BankStmtService.read, and move them to the “Selected service operations” section. Close the “Select service operations” form.
  10. On the “Processing options” fast tab, check the box for “Transform all requests” and click “Inbound transforms”.
  11. On the “Inbound transforms form, click “New”. Select “XML to Reconciliation” for the “Transform name”. Click “New”, and click “Yes” to the warning box. Select “CSV to XML” for the “Transform name” and Ctrl+S to save, and click “Yes” again to the warning box. 
    **Be sure that “CSV to XML” is the first line and “XML to Reconciliation” is the second record to have the correct order for the transforms. Close the “Inbound transforms” form.
  12. In the “Troubleshooting” fast tab, change the “Logging mode” to “Original document”. In the “Security” fast tab, select “initial” for the “Restrict to partition”.
  13. Lastly, click “Activate” to activate the new inbound port.
  14. Go to Cash and bank management | Common | Bank accounts. Select the “USA OPER” account and click “Edit”.  Expand the “Reconciliation” fast tab, and check the box for “Advanced bank reconciliation”. Click “OK” to confirm. 
  15. In the same section, right-click the drop-menu for “Statement format” and click “View details”. On the “Bank statement format” form, click “New”. Enter “BAI2” for the “Statement format” and “Name”. Select “AdvancedBankReconciliation” for the “Inbound port” and close the form. 
  16. On the “Bank accounts” form, select the drop menu for “Statement format”, and select “BAI2” that was just created. Close the “Bank accounts” form.
  17. Go to Cash and bank management | Setup | Cash and bank management parameters. Click the “Number sequences” tab, and select a number sequence for “Reconcile ID”, “Statement ID”, and “Download ID”. Close the form.
  18. Go to Cash and bank management | Common | Bank statements. Click “Import statement” in the action pane. Change the “Bank account” to “USA OPER”, select “BAI2” for the “Statement format”, and navigate to the location of the .txt file from the bank in the “File folder” line. Select the bank file, and click “OK”. 
  19. Click “Refresh” on the bank statements list page. Select the imported bank statement, and click “Validate” on the action pane.

NOTE: If you’re having issues getting your statement to import, we have updated the CSV->XML transform XSLT file to handle certain scenarios. This fix can be downloaded from PartnerSource or Lifecycle Services by searching for KB 2964064, or by opening a support request.

AIF inbound port
By legal entity
The inbound port that is used for importing bank statements must be mapped to a legal entity. It is a design requirement that, if there is more than one legal entity for which statements must be imported, each legal entity must have its own inbound port configured for import.

Tip: It is not required to restrict the inbound port to a legal entity if there is only one legal entity for which statements will be imported. In such cases, the statement is imported either manually or by using a batch job.

Steps


Advanced bank reconciliation is a new feature of AX2012, available from R2 onwards.


This new feature allows for the import of bank statements that can be automatically reconciled from within AX2012. This blog shows how to setup the InBound port to import and transform a BAI2 bank statement file.

BAI2 Format – File Layout:

  • Record Type: 01 – File Header – indicating the beginning of the file
  • Record Type: 02 – Group Header – identifying the group of accounts – a file may contain multiple groups, and would be followed by a 03 record
  • Record Type: 03 – Account Identifier & Summary Status – indicating the account number, activity summary and account status information
  • Record Type: 16 – Transaction Detail – as it says! Transaction detail information such as generic reference information is indicated in this record type (optional record)
  • Record Type: 49 – Account Trailer – indicating account control totals
  • Record Type: 98 – Group Trailer – indicating group control totals
  • Record Type: 99 – File Trailer – end of file indicator

BAI2 file:

  • Will only ever contain 1 record header (record type 01) and file trailer (record type 99)
  • Can contain multiple groups, where this happens the record type 02, 03, 16, 49, 98 would be repeated

BAI2 Record Formats:

Note: All of the below fields within a specific record are comma separated
BAI2 Format – File Header – 01
  • Record code - 01
  • Sender Id – alphanumeric value
  • Receiver Id – alphanumeric value
  • File Creation Date – YYMMDD format
  • File Identification Number – Unique value to distinguish files sent on the same date
  • Physical Record length – optional
  • Block Size – optional
  • Version Number – 2
BAI2 Format – Group Header – 02
Note: A group header highlights accounts from the same originator with the same as-of date
  • Record Code – 02
  • Ultimate Receiver Notification – optional, normally banks put the same value as in Receiver Id from the Header Record
  • Originator Identification – bank code or SWIFT BIC where the account being reported (in record 3) is held
  • Group Status:
    • 1 – Update – most commonly used for previous day reporting and same day reporting
    • 2 – Deletion
    • 3 – Correction
    • 4 – Test Only
  • As of Date – YYMMDD – as of date of all accounts with the group
  • As of Time – HHMM – in military format i.e. from 0000 – 2359
  • Currency Code
  • As of Date Modifier:
    • 1 – Interim previous day data
    • 2 – Final previous day – most commonly used for prior day reporting
    • 3 – Interim same day – most commonly used for intra-day reporting
    • 4 – Final same day
BAI2 Format – Account Identifier & Summary Status – 03
  • Record Code – 03
  • Customer Account Number – at the originator financial institution
  • Currency Code – optional
  • Type Code – optional* – indicates the type of balance (Summary/Transaction) being reported. - in this record type Account Status &  Activity Summary codes are used
  • Amount – optional
  • Item Count – optional*
  • Funds Type – optional*
BAI2 Format – Transaction Detail – 16
  • Record Code – 16
  • Type Code – details data type* – indicates the type of balance (Summary/Transaction) being reported. - in this record type Transaction Detail codes only are used
  • Amount
  • Funds Type*
  • Bank Reference - bank assigned reference to help identify the transaction
  • Customer Reference – as corporates, this is the field we’re interested in. It should contain our reference for reconciliation purposes
  • Text
BAI2 Format – Continuation Record – 88
If the data in any record type exceeds the physical record size, or if required for any other reason the 88 record type can be used to continue the previous record. A record type 88 can only follow a record type 03 (Account Identifier), 16 (Transaction Detail) 0r 88 (Continuation Record)
  • Record Code - 88
  • Next field
BAI2 Format – Account Trailer – 49
  • Record Code – 49
  • Account Control Total – Sum of all the Amount fields in the preceding 03 (Account Identifier) and all 16 (Transaction Detail) records
  • Number of Records – Total number of records for the account – including the 03, all 16 and 88 records and this 49 record
BAI2 Format – Group Trailer – 98
  • Record Code – 98
  • Group Control Total – Sum of all control totals in this group
  • Number of Accounts – The number of 03 records in this group
  • Number of records – The number of records in this group – including the 02, all 03, 16, 49 and 88 records, and this 98 record
BAI2 Format – File Trailer – 99
  • Record Code – 99
  • File Control Total – Sum of all control totals in the file
  • Number of Groups – The number of 02 records in this file
  • Number of Records – Total number of records in this file, including this 99 record


BAI2 File Format


The Bank Administration Institute (BAI) file format is used to electronically transmit transaction data from a bank to an organisation. Bank Administration Institute version 2 (BAI2) splits the payment amount into separate invoice references and corresponding payments. 

Note : BAI2 files are the file formats not always provided by some banking corporations, and as such bank file formats may need to be developed to suit the customer’s needs. The BAI2 file format is used here for demonstration purposes only.

The BAI2 file format is a structure text file with headers, lines and footer records. Each field is separated by a comma similar to a CSV file. 

With a multi date file format, each date must be contained within its own section, with a header and line for each section.

Sample file can be found here : Download Sample File 
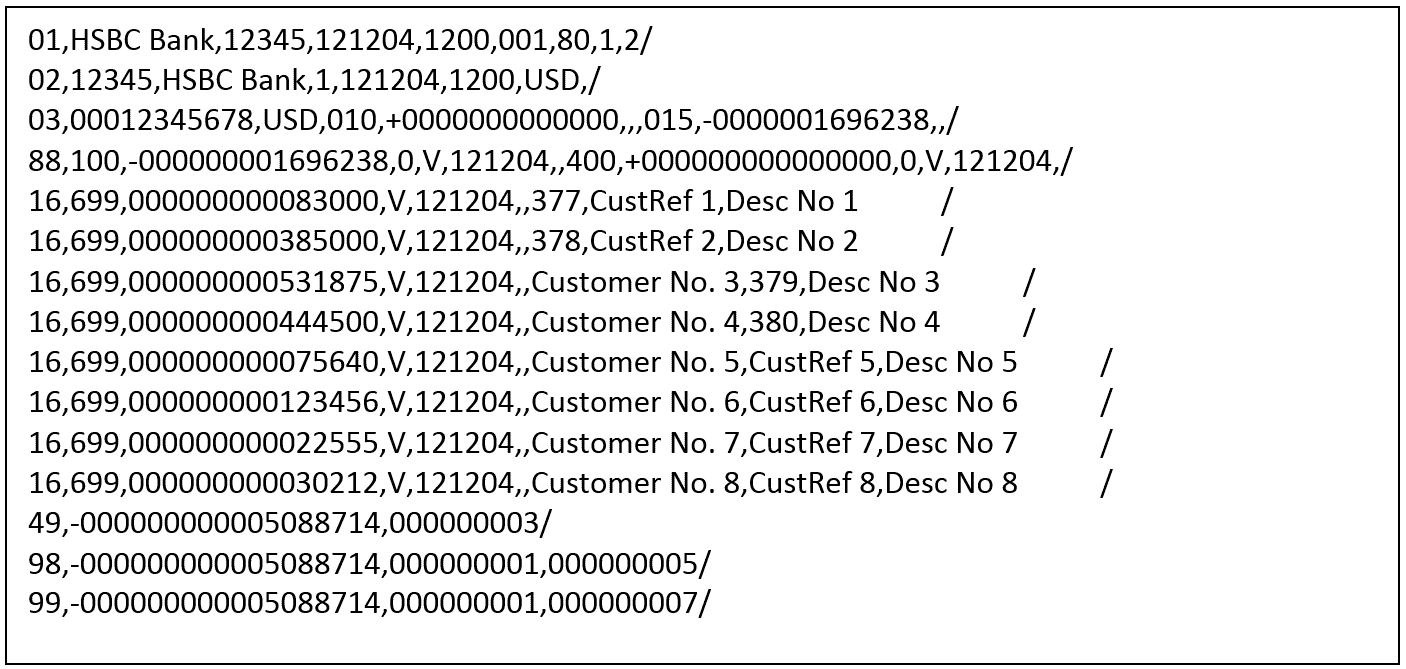
Example 1 – Single date file

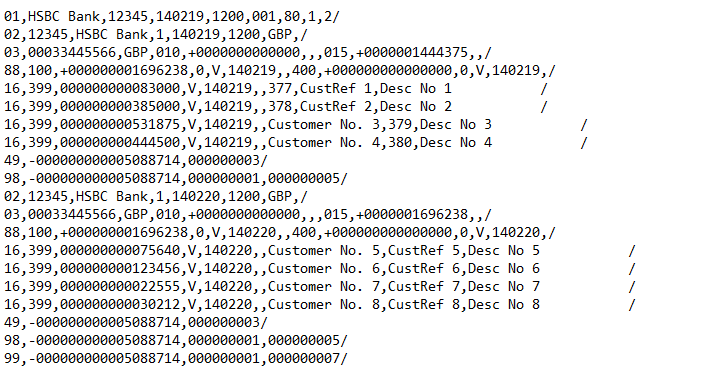
Example 2 – Multi date file

AIF Setup


In the AOT, under the Resources node, locate the BAI2 files. These files translate the electronic bank statements from their original format to a format that Microsoft Dynamics AX can use. 

The files that are required are called : 
  • AOT\Resources\BAI2CSV_to_BAI2XML_xslt 
  • AOT\Resources\BAI2XML_to_Reconciliation_xlst

Right-click the BAI2CSV_to_BAI2XML_xslt file, and then click Open 


In the Preview form, select XML document in the File type field.  


Click Export to generate XSLT templates and save the template. Close the form. 

Repeat the process for the BAI2XML_to_Reconciliation_xlst file.


Whilst in the development environment, click the Tools menu option and select “Application integration framework > Manage transforms” 


Create a new record, give this a name and an appropriate description, ensure that the type = “XSL”, then click load. Load the BAI2CSV_to_BAI2XML_xslt file.
Create a second record and load the BAI2XML_to_Reconciliation_xlst file.


Close the form and close the development environment.

InBound Ports


Before you can receive the BAI2 statement electronically, you must register custom services and adapters, manage operations and inbound transforms, and activate inbound ports. 

Browse to System administration > Setup > Services and Application Integration Framework 

Click New to create a new inbound port. 

In the Port name and Description fields, enter a suitable name and description of the inbound port. In the Adapter field, select File system adapter as the adapter name. In the URL field, enter a path for receiving electronic data. 


On the Service contract customisations FastTab, click Service operations to open the Select service operations form.


Add in the following bank service operations to the “Selected service operations” section.
In the Select service operations form, select the following from Remaining service operations and move to Selected service operations:
  • BankStmtService.create
  • BankStmtService.delete
  • BankStmtService.find
  • BankStmtService.getChangedKeys
  • BankStmtService.getKeys
  • BankStmtService.read


On the Processing options FastTab, select the Transform all requests check box to include inbound transforms. Then click the “Inbound transforms” button.


Click New to create a transform. Select the first of the transforms that you have already created previously.
Create a second record and add the second transform file that you have created.


These files should be in the following order to process the BAI2 file correctly. 
  1. BAI2CSV_to_BAI2XML_xslt
  2. BAI2XML_to_Reconciliation_xlst

Close the form. 


On the Troubleshooting FastTab, set the logging mode to “Original document”. 


On the Security FastTab, select the partition and company that this Inbound port relates to.


Once complete, click the “Activate” button to finish, this may take some minutes to complete. Close the forms when finished.


This completes the InBound port setup and AX2012 R2 is now ready to import and transform a BAI2 file.
Set up matching rules
You can set up reconciliation matching rules and matching rule sets to help with the bank reconciliation process. Reconciliation matching rules are a set of criteria that are used to filter bank statement and bank document lines during the reconciliation process. Using the Reconciliation matching rules form, you can select which actions and selection criteria are used when the matching rule is run during reconciliation.
Available actions include: Match with bank document – this action allows you to create criteria for how bank document and bank statement lines are matched.
Clear reversal statement lines – this action allows you to specify how reversal statement lines should be removed.
Mark new transactions – this action allow you to specify how new transactions are handled when the reconciliation rule runs.


SETUP/CONFIGURATION OF RECONCILIATION MATCHING RULES:

1. A Reconciliation matching rule should be created for the 469 Bank Transaction code that resembles the following.
SCREENSHOT469
2. A Reconciliation matching rule should be created for the 475 Bank Transaction code that resembles the following:
SCREENSHOT475
3. A Reconciliation matching rule should be created for the 169 Bank Transaction code that resembles the following:
SCREENSHOT169
4. A Reconciliation matching rule should be created for the 301 Bank Transaction code that resembles the following:
SCREENSHOT301
5. A Reconciliation matching rule should be created for the 575 Bank Transaction code that resembles the following:
SCREENSHOT575

6. Activate the reconciliation matching rules so that the Reconciliation matching rules have the Active flag marked.

7. Assign the Reconciliation matching rules to a Reconciliation matching rule set. The Reconciliation matching rule set would them resemble the following:
SCREENSHOTSET

After the Setup/Configuration of these Reconciliation matching rules that are now included in the single Reconciliation matching rule set, you can select this Reconciliation matching rule set on the Bank reconciliation journal after the Bank statements have been imported. By using the simple Setup/Configuration of the Reconciliation matching rules, you can use these Reconciliation matching rules in a manner that allows you to automatically match/create new adjustments for imported bank statements in AX
Reconcile a bank statement
After the bank statement has been imported into the Bank statements form, you can reconcile the bank statement by using the Bank reconciliation worksheet form.
On the bank reconciliation form, you will see the bank statement and the bank documents transactions listed. You can select transaction lines that match up to reconcile them.

Import The Bank Statement


Once a bank account has been set up to allow bank statement imports, the “Reconcile” group becomes available in the action pane. 


Click the “Bank statements” button to open the bank statements list page. 


The following form will be opened, click the “Import statement” button to continue.

Select the following : 
  • Bank account – Select the bank account that the statement will be imported into.
  • Statement format - Select the appropriate bank statement format.
  • File folder – Set the inbound folder where the files to be processed are held.
  • Import all files in this folder – Tick this is all files in the folder are to be imported.
  • Select file – Use this option to manually select a specific file. Reconcile after import – Select this to perform automatic reconciliation (Only if the rules have been set against the bank account).

Click Ok to continue.


When opened, the following will be displayed.


The “Net amount” and the “Total lines” fields will automatically populate when the “Validate” button has been clicked. 
The bank statements must be validated before a reconciliation can be performed.

Bank Reconciliation


After an electronic bank statement has been imported and validated in the Bank statements form, the bank statement can now be reconciled using the Bank reconciliation worksheet form. 


Note : The Bank reconciliation option is only available if the Advanced bank reconciliation check box is selected in the Bank accounts form on the Reconciliation FastTab. 


This can be performed in one of two ways : 


Click Cash and bank management > Journals > Bank reconciliation 


Or 


Click Cash and bank management > Common > Bank accounts. On the Action pane, in the Reconcile group, click Bank reconciliation.

Click New to create a new bank reconciliation record


Select the appropriate bank account, this will select the bank statements that have not yet been reconciled.


Note : Any previous un-reconciled balances will be added in to this bank reconciliation journal.


Click the “Lines” button


The reconciliation worksheet will be displayed, this worksheet is split into four distinct grids : 
  • Top left – Open statement lines – Imported un-reconciled bank statement lines
  • Top right – Open bank documents – Un-reconciled AX bank transactions
  • Bottom left – Matched statement lines – Matched bank statement lines Bottom right Matched bank documents – Matched AX bank transactions
 
The Line details FastTab will show additional line details for the selected statement line.


To match using the matching rules that have been set up, click the “Run matching rules” button.

Select either to run individual rules, or to run a set of rules.


Once run these match all transactions that meet the criteria set on the rules.

There is a one-to-many relationship between the “Matched statement lines” and the “Matched bank documents”.
Transactions can be manually matched by selecting the appropriate line(s) in both the Open statement lines grid and the Open bank documents grid, then clicking the “Match” button.

If there is a new transaction on the bank statement that does not yet exist in AX (eg bank charges), then mark the transaction and click “Mark as new”.


Once you have completed your matching process, click “Reconcile” to perform the reconciliation process.

If there are any transactions that you have marked as new, these will need to be posted. 


Browse to : Cash and bank management > Common > Bank statements, then edit the appropriate statement.
Select the line marked as “New”

On the line details FastTab, enter the appropriate financial details and financial dimension values

Then click “Post” to post the transaction.


The transaction will now have been posted and reconciled.

Cancel A Reconciled Transaction

 Individual “reconciled” bank transactions can have the reconciliation status set back to un-reconciled.
To do this browse to : Cash and bank management > Common > Bank document list 
Select the reconciled transaction, then click “Reconciliation relations”

From the Reconciliation details form, click the “Cancel reconciliation” button

Click OK to continue

The transactions will appear on the next reconciliation as un-reconciled items


The bank statement will have been fully reconciled now.

White paper like

Update NuGet package to new MS D365FO version

1. Import the NuGet package files from LCS for that particular version please take the PU version files only. a. Goto LCS-->Asset Libra...